
Embedded builders
Before you get into embedded builders, make sure you check out our getting started guide.
Anvil builder UIs can be embedded in your app or website. Embedding the builders can allow your users to build PDF templates, send e-signature packets, and create or edit Workflows within your app.
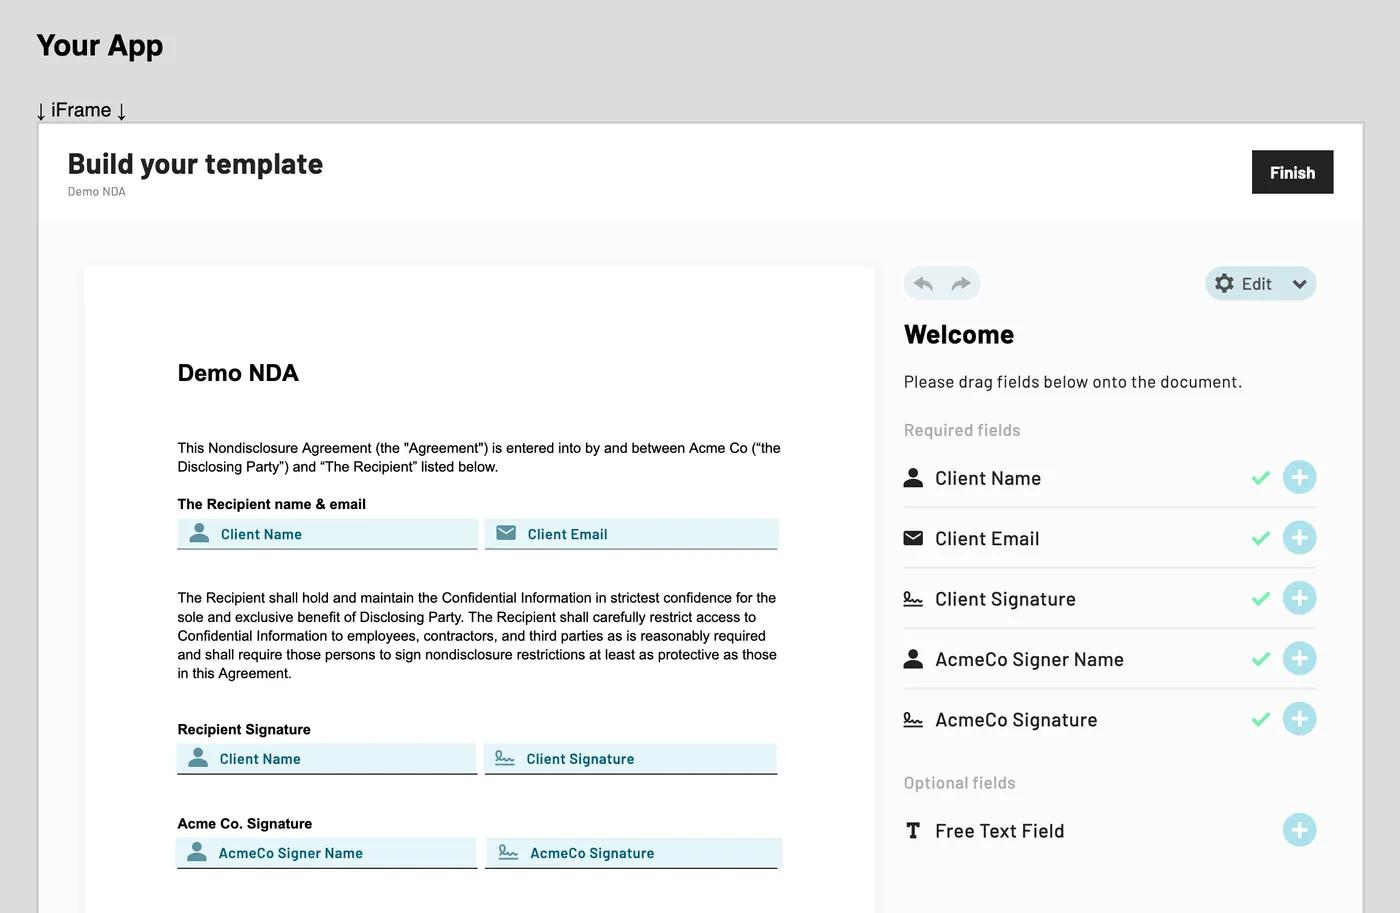 Embedding the PDF template builder. This UI can be shown in an iframe.
We support embedding for:
- PDF template builder
- E-signature packet builder
- Workflow builder
Why might you want to embed one of these builders? Embedding the builders in your product enables your users to set up their own Anvil objects, for example, documents for e-signatures. Embedding the PDF template builder can offload the work of template creation and editing from your team.
For example, let's say that your product is an HR platform that provides offer letter feature for your customers. While all offer letter documents will be expecting some common set of information, each of your customers is a unique company and likely will have a unique offer letter document with custom language.
To make things completely automated, you've decided that it would be ideal if:
- HR managers could upload the custom offer letter document that they need to be filled and signed.
- They could then spend a few moments mapping out the required fields on the PDF for you.
- They could do this securely, with temporary, limited access without leaving your website.
This is a perfect scenario for leveraging embedded editing of PDF Templates!
Which builder should I embed?
TL;DR: Most of our customers choose to embed the PDF template builder. We encourage you to start there. The PDF template builder provides a simple, configurable UI for your users to add fields to PDFs, and it gives you a lot of flexibility in how you use the templates. If you want to fill your user's custom PDFs, use the PDF template builder. If you want to send e-sign packets with your user's custom PDFs, the PDF template builder is also often the best option.
See the e-sign builder and Workflow builder sections for more info on their intended use cases.
Quick start
First make sure you have an Anvil account and have grabbed your API keys. See our Getting Started guide for full details.
Embedding one of the builders is a simple two step operation:
- Call the
generateEmbedURLGraphQL mutation with theeidof the object you want to embed - Use the resulting URL in an
iframe
Below is a an example using our Node.js API client.
// This code is meant to run on your server.
import Anvil from '@anvilco/anvil'

const anvilClient = new Anvil({ apiKey: ANVIL_API_TOKEN })

const generateEmbedURLMutation = `
  mutation GenerateEmbedURL(
    $eid: String!
    $type: String!
    $validForSeconds: Int
    $metadata: JSON
    $options: JSON
  ) {
    generateEmbedURL(
      eid: $eid
      type: $type
      validForSeconds: $validForSeconds
      metadata: $metadata
      options: $options
    ) {
      url,
      requestTokenEid
    }
  }
`
const { data: generateResponse, errors } = await anvilClient.requestGraphQL({
  query: generateEmbedURLMutation,
  variables: {
    // This will create a link for the PDF template builder.
    // See the other sections for their settings.
    eid: pdfTemplateEid,

    // `type` specifies the builder you want to embed
    type: 'edit-pdf-template',

    // Options specific to your chosen `type`
    options: {},

    // Common options across all `type`s
    validForSeconds: 10 * 60, // 10 minutes
    metadata: {
      myUserId: '1234',
      anythingElse: 'you want',
    },
  },
})

if (errors) {
  throw new Error(JSON.stringify(errors, null, 2))
}

const { url: embedURL } = generateResponse.data.generateEmbedURL
console.log(embedURL)

// Pass embedURL to your app's frontend, then
// put embedURL in your iframe
//
// <iframe src={embedURL} />
See a runnable JavaScript example for embedding a PDF template in our example scripts repository.
For full details, see each section
PDF template builder
The embedded PDF template builder enables your own users to create and edit custom PDF templates from within your app. That is, it allows your users to upload their own PDF documents and tag them with fillable and signable fields. You can then fill those templates or use them in signature packets just like you'd do with templates your own team created.
Embedding the PDF template builder in a sample app.
The PDF template builder is the most commonly embedded Anvil builder. It provides the simplest experience for your users, and the most flexibility in how to use the templates.
Capabilities
The embeddable PDF template builder allows you to give a stripped-down template build process to your users. Via the API, you specify a few options plus a list of fields available to the user, the template builder will guide them through the setup process allowing them to add only the specific fields you have chosen.
Fields can be specified with aliases that match data names in your own system, such as column names from your database, and fields can be customized on a per-embeddable-link basis. Fields added to the document will be mapped to the correct types and data in your system based on the aliases you choose.
Your custom fields can also be automatically mapped to the document using AI.
We support several other customizations so the builder integrates nicely into your product:
- Required and optional fields
- Configurable UI text
- Titlebar can be hidden
- Submitting the builder can be triggered programmatically, allowing you to use your own submit button
See the options reference below for details.
Embedding flow
There are two main scenarios for embedding the PDF template builder:
- Create a new PDF template - you want your users to upload and set up a new PDF
- Edit an existing template - your user already has a PDF template they want to modify by adding or updating fields, replacing the document, etc.
And there are two GraphQL mutations involved:
createCast({ isTemplate: true, file: uploadedFile })- upload a PDF to create a PDF template (Castobject).createCastis only necessary when creating a new template, not when editing an existing template.generateEmbedURL({ eid: cast.eid })- generate a URL that can be embedded in an iframe.
Expanding a bit more, here are steps most Anvil customers follow. Note that editing an existing template is a subset of creating a new PDF template.
If you only need to edit existing templates, jump to step three!
- Upload PDF - Your user uploads a PDF to your system
- At this time, for maximum flexibility, you provide your own upload input and upload route on your server
- Create a PDF template - In your upload route handler, your system uploads the user-uploaded file to Anvil via the
createCastmutation, creating a PDF template - Generate an embed URL - Use the
generateEmbedURLmutation on your server to generate the embeddable builder URL- You can use this any time you want to have your user update a template
- This is where you can specify the fields available to the user and other configuration options
- Embed in an iframe - Send the embeddable builder URL to your frontend, then render it in an iframe
- Receive iframe messages - When the user is finished editing the template, the parent frame will receive events with template information
- Fill a PDF template - Fill customer templates with our PDF filling endpoint
- Generate a signature packet - Use the template to create an EtchPacket via the
createEtchPacket()mutation- You pass data to fill the template to
createEtchPacket - You specify which signers sign which fields in
createEtchPacketas well
- You pass data to fill the template to
User uploads a file
Currently, if you'd like your user to upload new files, you will provide the uploader UI in your app. We've chosen to leave this up to you as it gives you full control in how you want to display the uploader to your users.
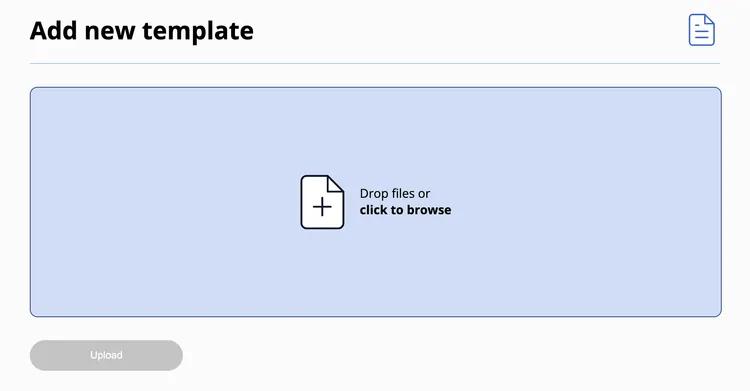 An upload input from a demo application
See uploading from your own route handler for an example creating a template from your own route handler.
Create a PDF template
Once your user has uploaded a file to your system, pass the uploaded file to the createCast mutation. createCast will give you a new Cast object. A "Cast" is a PDF template in Anvil's system. In subsequent steps, you will be able generate an embeddable URL to allow your users to edit this new Cast object.
Here is a JavaScript example, the query and response are applicable in any language:
import fs from 'fs'
import Anvil from '@anvilco/anvil'

const anvilClient = new Anvil({ apiKey: ANVIL_API_TOKEN })

const createCastMutation = `
  mutation CreateCast(
    $organizationEid: String,
    $title: String,
    $file: Upload!,
    $isTemplate: Boolean,
    $detectFields: Boolean,
    $allowedAliasIds: [String],
  ) {
    createCast (
      organizationEid: $organizationEid,
      title: $title,
      file: $file,
      isTemplate: $isTemplate,
      allowedAliasIds: $allowedAliasIds,
      detectFields: $detectFields,
    ) {
      eid
      name
      title
      isTemplate
    }
  }
`

const fileBytes = fs.readFileSync('./any-pdf.pdf')
const buffer = Buffer.from(fileBytes)

// Upload the PDF and create a template
const { data: createCastResponse, errors } = await anvilClient.requestGraphQL({
  query: createCastMutation,
  variables: {
    // Anvil.prepareGraphQLFile() accepts a buffer, stream, or file object
    file: Anvil.prepareGraphQLFile(buffer, {
      // filename is required with a buffer or stream
      filename: 'Test Upload.pdf',
      mimetype: 'application/pdf',
    }),

    title: 'Test Upload',
    isTemplate: true,
    detectFields: true,
  },
})

if (errors) console.log(errors)

const newPDFTemplate = createCastResponse.data.createCast
console.log('createCast response', JSON.stringify(createCastResponse, null, 2))
Create a template from your own route handler
You can call createCast from your own upload route. Here's an example in JavaScript + express using multer to handle multipart uploads:
import express from 'express'
import multer from 'multer'

const upload = multer({ dest: 'uploads/' })
const app = express()

app.post('/upload', upload.single('anvilupload'), function (req, res, next) {
  // req.file has the user-uploaded file
  const file = Anvil.prepareGraphQLFile(req.file, {
    // filename is required with a buffer or stream
    filename: 'Test Upload.pdf',
    mimetype: 'application/pdf',
  })

  const {
    data: createCastResponse,
    errors
  } = await anvilClient.requestGraphQL({
    query: createCastQuery,
    variables: {
      file, // Pass the uploaded file to anvil
      title: 'Test Upload',
      isTemplate: true,
      detectFields: true,
    },
  })

  if (errors) console.log(errors)

  // Now you have a new PDF template!
  const newPDFTemplate = createCastResponse.data.createCast

  // generate an embed URL or whatever you'd like here...
})
Generate an embed URL
Once you have a PDF template (Cast object) in your Anvil organization, either from the steps above, or one that was already uploaded, you can create an embeddable URL. Creating an embeddable URL is done on your server via the generateEmbedURL mutation.
The generateEmbedURL mutation accepts several options allowing customization. See the full options reference for details.
Here is a JavaScript example, the query and response are applicable in any language:
// This example is meant to be run on your server

import Anvil from '@anvilco/anvil'

const anvilClient = new Anvil({ apiKey: ANVIL_API_TOKEN })

const generateEmbedURLMutation = `
  mutation GenerateEmbedURL(
    $eid: String!
    $type: String!
    $validForSeconds: Int
    $metadata: JSON
    $options: JSON
  ) {
    generateEmbedURL(
      eid: $eid
      type: $type
      validForSeconds: $validForSeconds
      metadata: $metadata
      options: $options
    ) {
      url,
      requestTokenEid
    }
  }
`
const { data: generateResponse, errors } = await anvilClient.requestGraphQL({
  query: generateEmbedURLMutation,
  variables: {
    // This will create a link for the PDF template builder.
    // See the other sections for their settings.
    eid: castEid, // A castEid is the same as pdfTemplateEid
    type: 'edit-pdf-template',
    options: {
      // See the options reference section for details
      mode: 'preset-fields',
      fields: [
        {
          name: 'Email',
          type: 'email',
          aliasId: 'email',
          required: true,
        },
      ],
    },

    // Common options
    validForSeconds: 10 * 60, // 10 minutes
    metadata: {
      myUserId: '1234',
      anythingElse: 'you want',
    },
  },
})

if (errors) {
  throw new Error(JSON.stringify(errors, null, 2))
}

const { url: embedURL } = generateResponse.data.generateEmbedURL
console.log(embedURL)

// Pass embedURL to your app's frontend, then
// put embedURL in your iframe!
//
// <iframe src={embedURL} />
Embed in an iframe
Once you have generated an embed URL on your server with the generateEmbedURL mutation, you can pass that response's url to your frontend, then use the url as the src attribute on your iframe.
<iframe src="{response.url}"></iframe>
The url is one time use. Once loaded in the iframe the user will only have access to the PDF template for the lifespan of the iframe. If you need to reload the iframe, generate a new embed URL.
The user will only have access to edit the PDF template specified in the generateEmbedURL call, they will not be able to access any other templates in your Anvil account.
Embed the URL with a React component
You can use our AnvilEmbedFrame React component to make embedding easier. It will render an iframe and subscribe to the finish events from Anvil.
yarn add @anvilco/anvil-embed-frame
Then add it to your app:
import AnvilEmbedFrame from '@anvilco/anvil-embed-frame'
;<AnvilEmbedFrame
  iframeURL={etchSignURL || workflowURL || editorURL}
  onEvent={(event) => console.log('Event object:', event)}
  className="anvil-embed-frame"
/>
Programmatically submit the iframe
You can programmatically submit the template builder. This allows you to trigger a submit action with your own button in your app. Usually it is used in conjunction with the showPageTitleBar: false option in generateEmbedURL to hide the button in our UI, see the options reference for details. An example of what this might look like in your app, the "Publish Template" button is in the example app:
A publish button is outside the iframe that calls into the iframe to submit the page
Programmatically submitting the iframe is done by sending a castEditSubmit event to the iframe via postMessage:
const iframe = document.querySelector('iframe')
iframe.contentWindow.postMessage(
  {
    action: 'castEditSubmit',
  },
  '*'
)
On submit, if the user has not added all the required fields, you will receive a castEditSubmitError iframe event with the fields that need to be added. See the event reference for details.
If you are using React with our AnvilEmbedFrame you can get the iframeRef from the AnvilEmbedFrame
const embedFrameRef = React.createRef()
<AnvilEmbedFrame
  ref={embedFrameRef}
  iframeURL={generateResponse.url}
  onEvent={(eventObject) => {}}
/>

// Then in an onClick handler for your own button:
const handleSubmit = () => {
  embedFrameRef.iframeRef.contentWindow.postMessage({
    action: 'castEditSubmit'
  }, '*')
}
Receive iframe messages
The iframe will emit events to the parent frame for various actions, for example, when the iframe loads, when the user finishes editing, etc. You can subscribe to them by attaching a message event listener to your page's window.
window.addEventListener('message', ({ origin, data: messagePayload }) => {
  if (origin !== 'https://app.useanvil.com') return
  // messagePayload will be an object in the format:
  //
  // {
  //   "action": "castEditComplete",
  //   "objectEid": "bdwIX5TUiLBzldgdwzL2",
  //   "organizationSlug": "demo-org"
  // }
})
If you use AnvilEmbedFrame, events will come in via the onEvent prop.
<AnvilEmbedFrame
  iframeURL={generateResponse.url}
  onEvent={(eventObject) => {
    // eventObject will be in the form
    //
    // {
    //   "action": "castEditComplete",
    //   "objectEid": "bdwIX5TUiLBzldgdwzL2",
    //   "organizationSlug": "demo-org"
    // }
  }}
/>
See the iframe event reference for all possible events.
Mapping PDF fields to your system
When you create a PDF template embed URL, you will specify a set of fields that may be on the uploaded document.
Those fields can be mapped into the document in two ways:
- You can automatically map them to the document with AI
- The user can drag them into the document from the sidebar
Both ways are supported on all documents. For example, you can use AI to map fields, then the user can drag in any fields that were missed by the AI.
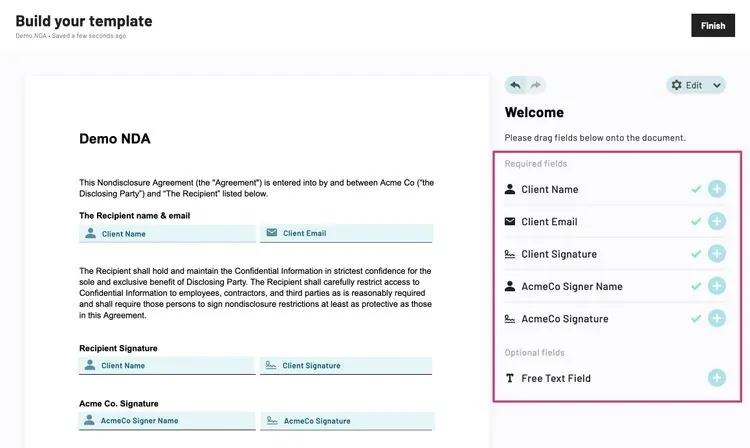 The fields in the sidebar are customizable
These fields are fully customizable. In the generateEmbedURL call, you are able to specify the field name, its type, and other attributes about the field.
Templates uploaded by your users can be used just like any other templates — you can fill them, use them in e-signature packets, and attach them to Workflows.
Ultimately, you'll want to fill user-configured templates with data from your own system, or assign them to signers of your choosing. How does this connection work? It is handled by your specified aliasId property on each field.
For example, the generateEmbedURL variables for the screenshot above might be:
{
  "eid": "NA1cz2DA64XH09Ek9b16B",
  "type": "edit-pdf-template",
  "validForSeconds": 600,
  "options": {
    "mode": "preset-fields",
    "fields": [
      {
        "name": "Client Name",
        "type": "fullName",
        "aliasId": "customClientName",
        "required": true,
      },
      {
        "name": "Client Email",
        "type": "email",
        "aliasId": "customClientEmail",
        "required": true,
      },
      {
        "name": "Client Signature",
        "type": "signature",
        "aliasId": "customClientSignature",
        "required": true,
      },

      {
        "name": "AcmeCo Signer Name",
        "type": "fullName",
        "aliasId": "acmeSignerName",
        "required": true,
      },
      {
        "name": "AcmeCo Signature",
        "type": "signature",
        "aliasId": "acmeSignature",
        "required": true,
      },

      {
        "name": "Free Text Field",
        "type": "shortText",
        "aliasId": "customTextField",
        "required": false,
      },
    ]
  }
}
In this case, your users will be creating templates with fields customClientName, customClientEmail, and customClientSignature, acmeSignerName, acmeSignature, and optionally customTextField. When filling the template, or getting it signed, you will use these keys to fill or attach to signers.
Fill your PDF template
Templates can be filled in a standalone way by using the PDF filling API. To fill your new template simply use the castEid you got back from the createCast mutation.
Note that we're using the IDs we specified in the last section to fill our hypothetical new template.
POST https://app.useanvil.com/api/v1/fill/{castEid}.pdf
{
  "data": {
    "customClientName": "Robin Smith",
    "customClientEmail": "robin@example.com",
    "customTextField": "Lorem Ipsum",

    "acmeSignerName": "Pat Reynolds",

    // You can send data for fields that may not exist.
    // Anvil will not error.
    "probablyNotInATemplate": "test"

    // You can also omit data for fields that _do_ exist.
    // Anvil will not error.
  }
}
// => response body will be binary PDF bytes
See the PDF fill docs for full details.
Create an EtchPacket
You can get your new template signed by using it when creating an etch packet. Similar to filling a PDF, you use the castEid resulting from the createCast call in the createEtchPacket payload, and all the field IDs you chose in the generateEmbedURL call:
{
  "name": "Some Test",
  "isDraft": false,
  "isTest": true,
  "files": [{
    "id": 'sampleTemplate',

    // use the castEid you received from `createCast`
    "castEid": castEid,
  }],

  "data": {
    "payloads": {
      "sampleTemplate": {
        "data": {
          // The keys here are aliasIds you chose in generateEmbedURL
          "customTextField": "Lorem Ipsum",

          // You can send data for fields that may not exist.
          // Anvil will not error.
          "probablyNotInATemplate": "test"
        },
      },
    },
  },

  "signers": [
    {
      "id": "signer1",
      "name": "Robin Smith",
      "email": "robin@example.com",
      "signerType": "email",
      "fields": [
        // The `fieldId`s here are `aliasId`s you chose in generateEmbedURL
        {
          // fileIds are specified in the `files` property above
          "fileId": "sampleTemplate",
          // fieldIds are specified in the aliasId when you generate the
          "fieldId": "customClientSignature",
        },

        // Name and email fields will be populated with the signer name & email
        {
          "fileId": "sampleTemplate",
          "fieldId": "customClientName",
        },
        {
          "fileId": "sampleTemplate",
          "fieldId": "customClientEmail",
        },

        // You can attach fields that may not be in the template.
        // Anvil will only error if the signer is not attached to any fields.
        {
          "fileId": "sampleTemplate",
          "fieldId": "probablyNotInATemplate",
        }
      ],
    },
    {
      "id": "signer2",
      "name": "Path Reynolds",
      "email": "pat@acme.com",
      "signerType": "email",
      "fields": [
        {
          "fileId": "sampleTemplate",
          "fieldId": "acmeSignerName",
        },
        {
          "fileId": "sampleTemplate",
          "fieldId": "acmeSignerName",
        },
      ],
    }
  ],
}
See the Etch e-sign guide for full details.
Auto-mapping PDF fields with AI
By default in the PDF template builder, your users will need to place fields you specify into the document.
You can save your users time and effort by using AI to automatically map fields found on the PDF to fields from your list of custom fields. After AI has worked its magic, many, and in some cases all, of the fields on a document will have already been mapped for your users when you show the PDF template builder.
On document upload, Anvil's AI can do a few things:
- Field finding: AI will find fields on documents, even documents that have been scanned or created with MS word or Google Docs.
- Label and type finding: Next, AI will find the best label and type for each field.
- Field mapping: Lastly, AI will map your own custom field information to fields that were found on the document in the previous step.
That last step, field mapping, will do the mapping work that the user would otherwise do by dragging fields from the sidebar and dropping them into the document.
To get field mapping to work, you will need to specify your fields in an aliasIds variable when calling createCast.
For example, you may expect customClientName to be on the uploaded document. You would specify "customClientName" in this aliasIds field. When our AI is analyzing your document and it finds a suitable employee name field, it will set your field alias, "customClientName", as the new field's aliasId.
aliasIds can either be an array of strings or an array of objects. Here's the example above enabling AI using an array of objects:
import fs from 'fs'
import Anvil from '@anvilco/anvil'

const anvilClient = new Anvil({ apiKey: ANVIL_API_TOKEN })

const createCastMutation = `
  mutation CreateCast(
    $title: String
    $file: Upload!
    $isTemplate: Boolean

    $aliasIds: JSON
    $detectBoxesAdvanced: Boolean
    $advancedDetectFields: Boolean
  ) {
    createCast (
      title: $title
      file: $file
      isTemplate: $isTemplate

      aliasIds: $aliasIds
      detectBoxesAdvanced: $detectBoxesAdvanced
      advancedDetectFields: $advancedDetectFields
    ) {
      eid
      name
      title
      isTemplate
    }
  }
`

const fileBytes = fs.readFileSync('./any-pdf.pdf')
const buffer = Buffer.from(fileBytes)

// Field aliases from your own system. AI will try to assign found fields
// to field information specified in this object
const aliasIds = {
  // The key is an aliasId you expect to find on the document
  customClientName: {
    // `description` describes to the LLM how to detect this particular field. Be concise but descriptive in your descriptions.
    description:
      'A name of a client. Client is often the recipient on agreements.',
  },
  customClientEmail: {
    description: 'An email of a client.',
  },
  customClientDob: {
    description: "A client's date of birth",

    // You can specify other field attributes you would like associated with
    // this field. It will use these attributes instead of AI generated
    // attributes when this field is found
    name: 'Client Date of Birth',
    type: 'date',
    format: 'MM/DD/YYYY',

    // All supported attributes that will be mapped into a found field:
    // "type"
    // "name"
    // "format"
    // "alignment"
    // "fontSize"
    // "fontWeight"
    // "fontFamily"
    // "textColor"
    // "textStyle"
  },
}

const { data: createCastResponse, errors } = await anvilClient.requestGraphQL({
  query: createCastMutation,
  variables: {
    // AI auto-labeling parameters
    detectBoxesAdvanced: true, // Use AI to find fields on unfillable PDFs
    advancedDetectFields: true, // Use AI to discover field labels and types

    // Field aliases from your own system. AI will try to assign found fields
    // to field information specified in this object
    aliasIds: aliasIds,

    // The rest are the same as previous examples.

    // Anvil.prepareGraphQLFile() accepts a buffer, stream, or file object
    file: Anvil.prepareGraphQLFile(buffer, {
      // filename is required with a buffer or stream
      filename: 'Test Upload.pdf',
      mimetype: 'application/pdf',
    }),

    title: 'Test Upload',
    isTemplate: true,
    detectFields: true,
  },
})
Once you have uploaded the Cast object, generate an embdded Template builder URL with fields that have matching field aliases as those specified above.
Note that all specified aliases may not be used on every document, and all fields on a document may not be mapped to one of your aliases. The AI will only use aliases that it deems are matches. If matching does not work as you intend, adjust the aliasIds array and / or tweak your descriptions.
Reference: PDF template embed options
The generateEmbedURL mutation accepts an options variable. options allows you to specify properties that modify the PDF template builder behavior and UI.
First things first, in order to show the PDF template builder, the type variable passed to generateEmbedURL must be 'edit-pdf-template'. For example:
generateEmbedURL({
  eid: 'YFizcDAV4XH09UCkQ4LI', // A Cast (PDF template) EID
  type: 'edit-pdf-template', // Indicates you are embedding a PDF Template
  options: {
    // Options specific to the embedded PDF template builder go here!
  },
})
mode: 'preset-fields'
At this time, all of the options described here for the embedded PDF template builder apply when the mode option is set to 'preset-fields'
{
  "eid": "YFizcDAV4XH09UCkQ4LI",
  "type": "edit-pdf-template",
  "options": {
    "mode": "preset-fields",

    // Other options...
    "fields": [
      // ...
    ]
  }
}
The central function of the preset-fields mode is to show a simplified sidebar with a preset list of fields.
The preset list of fields is totally configurable by you via the fields option.
Fields
The fields array allows you to set up the fields that the user is able to drag into the document. These fields are fully configurable: they can have any name you want, use one of several field types, and set field-level options like font information.
They can also be configured to map onto data in your system. See the mapping PDF fields to your system section for more information.
Common field options:
name- The name shown to the user in the sidebartype- All field typesaliasId- the id that maps to data in your system. See mapping PDF fields to your system for more info.required- When true, the document will need to have at least one instance of this field in order for the user to submit the page. If a user submits the page without all required fields, it will show them an error and emit acastEditSubmitErroriframe event. See the programmatically submitting an iframe section for more details.
Optional field options:
alignment-"center","left","center", or"right"fontSize- Font size in points:12fontWeight-"normal","bold","boldItalic", or"italic"fontFamily- Any google font,"Helvetica","Times new roman", or"Courier"textColor- Text color in hex. For example"#a00000"
Date field options:
format: The date format to output on the document. For example:MMMM Do YYYY. See the moment.js docs for more information.
An example JSON payload:
{
  "eid": "YFizcDAV4XH09UCkQ4LI",
  "type": "edit-pdf-template",
  "options": {
    // `mode` must be set to "preset-fields"
    "mode": "preset-fields",
    "fields": [
      {
        "name": "Full name",
        "type": "fullName",
        "aliasId": "name",
        "required": true,

        // optional fields
        "alignment": "center",
        "fontSize": 12,
        "fontWeight": "boldItalic",
        "fontFamily": "Futura",
        "textColor": "#a00000",
      },
      {
        "name": "Date of birth",
        "type": "date",
        "aliasId": "dob",
        "required": false,

        // optional date fields:
        "format": "MMMM Do YYYY", // see moment.js docs
      },
      {
        "name": "Client signature",
        "type": "signature",
        "aliasId": "clientSignature",
        "required": false,
      },
      {
        "name": "Client initials",
        "type": "initial",
        "aliasId": "clientInitials",
        "required": false,
      },
      {
        "name": "Client signature date",
        "type": "signatureDate",
        "aliasId": "clientSignatureDate",
        "required": false,
      },
    ],
  },
})
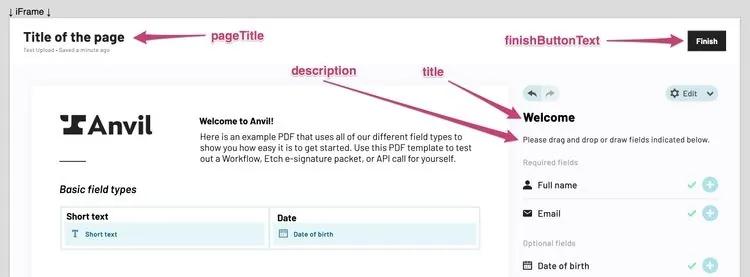
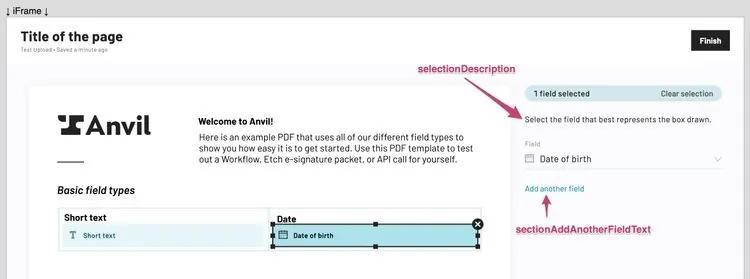
UI text options
A number of pieces of text in the UI are configurable via options. An example JSON payload:
{
  "eid": "YFizcDAV4XH09UCkQ4LI",
  "type": "edit-pdf-template",
  "options": {
    // `mode` must be "preset-fields"
    "mode": "preset-fields",

    // Title bar options
    "pageTitle": "Title of the page",
    "finishButtonText": "Submit",

    // Hides the title bar when set to false. Default: true.
    // When set to false, `pageTitle` and `finishButtonText` are not used.
    // Use the `castEditSubmit` iframe event to submit the page programmatically
    "showPageTitleBar": false,

    // Sidebar copy when no fields are selected
    "title": "Welcome",
    "description": "Please drag and drop or draw fields indicated below.",

    // Sidebar copy when a field is selected
    "selectionDescription": "Select the field that best represents the box drawn.",
    "selectionAddAnotherFieldText": "Add another field",

    // Other options
    "fields": [ ... ],
  },
})
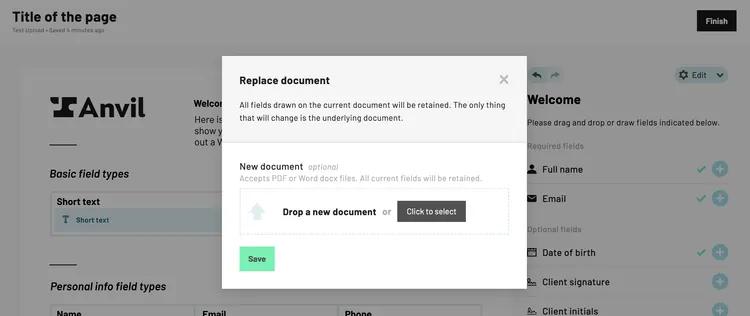
Replace document action
We offer a way for the user to replace the underlying PDF document by way of the "showReplaceDocumentAction" option. When it's set to true, the user will be able to upload a new PDF document to replace the current PDF document.
When the user uploads a new document, the fields already added to the document will not change, only the underlying PDF will change.
Example:
{
  "eid": "YFizcDAV4XH09UCkQ4LI",
  "type": "edit-pdf-template",
  "options": {
    // `mode` must be "preset-fields"
    "mode": "preset-fields",

    // Allows a way for the user to upload a new version of the document
    "showReplaceDocumentAction": true,

    // Other options
    "fields": [ ... ],
  },
})
An Edit dropdown will be shown
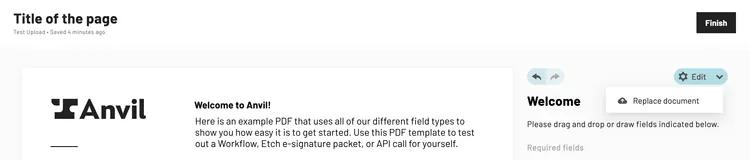
When clicked, the user will be able to upload their new document.
Reference: PDF template iframe events
Here is a quick reference of all iframe events that may be emitted from the iframe. They are in lifecycle order. This reference covers PDF template-specific events. For general error handling see the handling errors section.
castEditLoad is triggered when the builder UI is fully loaded in the iframe.
{
  "action": "castEditLoad",
  "castEid": "JTe37QQ5VZuGBG22sfu5",
  "organizationSlug": "demo"
}
castEditFieldsAdded is triggered each time the user adds a field to the PDF template. This includes dragging them in from the sidebar and drawing them on the document.
{
  "action": "castEditFieldsAdded",
  "castEid": "JTe37QQ5VZuGBG22sfu5",
  "organizationSlug": "demo",
  "fieldsAdded": [
    {
      "id": "cast10517d60237011efad5a4b05eee6aaa2",
      "aliasId": "clientSignature",
      "name": "Client signature",
      "type": "signature",
      "required": true,
      "pageNum": 0
    }
  ]
}
castEditFieldsRemoved is triggered each time the user removes a field from the PDF template.
{
  "action": "castEditFieldsRemoved",
  "castEid": "JTe37QQ5VZuGBG22sfu5",
  "organizationSlug": "demo",
  "fieldsRemoved": [
    {
      "id": "cast10517d60237011efad5a4b05eee6aaa2",
      "aliasId": "clientSignature",
      "name": "Client signature",
      "type": "signature",
      "required": true,
      "pageNum": 0
    }
  ]
}
castEditFieldsChanged is called each time a field or set of fields is changed. It will be called if they change the type, name, or choose a different field from the field dropdown in the sidebar.
{
  "action": "castEditFieldsChanged",
  "castEid": "JTe37QQ5VZuGBG22sfu5",
  "organizationSlug": "demo",

  // `fieldsChanged` will have more than 1 item if the user has multiple fields
  // selected when making a field change.
  "fieldsChanged": [
    {
      "id": "cast10517d60237011efad5a4b05eee6aaa2",
      "aliasId": "clientSignature",
      "name": "Client signature",
      "type": "signature",
      "required": true,
      "pageNum": 0
    }
  ]
}
castEditSelectedFieldsChanged is called each time the user selects fields(s) in the embedded PDF template builder. It will also be called when the user deselects all fields.
{
  "action": "castEditSelectedFieldsChanged",
  "castEid": "JTe37QQ5VZuGBG22sfu5",
  "organizationSlug": "demo",

  // `fieldsSelected` will be an array with all fields selected by the user.
  // `fieldsSelected` will be `null` when no fields are selected
  "fieldsSelected": [
    {
      "id": "cast10517d60237011efad5a4b05eee6aaa2",
      "aliasId": "clientSignature",
      "name": "Client signature",
      "type": "signature",
      "required": true,
      "pageNum": 0
    }
  ]
}
You can also fetch all fields on the PDF template being edited with the castEditGetFields event. You can trigger the event via calling postMessage on the iframe similar to programmatically submitting the iframe.
// Trigger the event
iframe.contentWindow.postMessage(
  {
    action: 'castEditGetFields',
  },
  '*'
)
You will receive the following event payload:
{
  "action": "castEditGetFields",
  "castEid": "JTe37QQ5VZuGBG22sfu5",
  "organizationSlug": "demo",
  "fields": [
    {
      "id": "cast10517d60237011efad5a4b05eee6aaa2",
      "aliasId": "clientSignature",
      "name": "Client signature",
      "type": "signature",
      "required": true,
      "pageNum": 0
    },
    ...allOtherFields,
  ]
}
castEditSubmit is triggered when the page is submitted by the user or by the programmatic castEditSubmit iframe event.
{
  "action": "castEditSubmit",
  "castEid": "JTe37QQ5VZuGBG22sfu5",
  "organizationSlug": "demo"
}
castEditSubmitError is triggered when there are validation errors on the page. It will give you information on which fields the user still needs to add to the template.
{
  "action": "castEditSubmitError",
  "castEid": "JTe37QQ5VZuGBG22sfu5",
  "organizationSlug": "demo",
  "missingRequiredFields":["name","email"],
  "errorMessage": "Missing required fields"
}
castEditSubmitSuccess is triggered when the submission was successful (no errors!).
{
  "action": "castEditSubmitSuccess",
  "castEid": "JTe37QQ5VZuGBG22sfu5",
  "organizationSlug": "demo"
}
castEditComplete is triggered when everything is finished. By default a "Thank you" page will be shown to the user. When you receive this event, it is ok to close the iframe.
{
  "action": "castEditComplete",
  "castEid": "JTe37QQ5VZuGBG22sfu5",
  "organizationSlug": "demo"
}
E-signature packet builder
Embedding the e-signature packet editor allows your users to create and send e-signature packets. They will be able to add documents, connect signers, and ultimately send the e-signature packet.
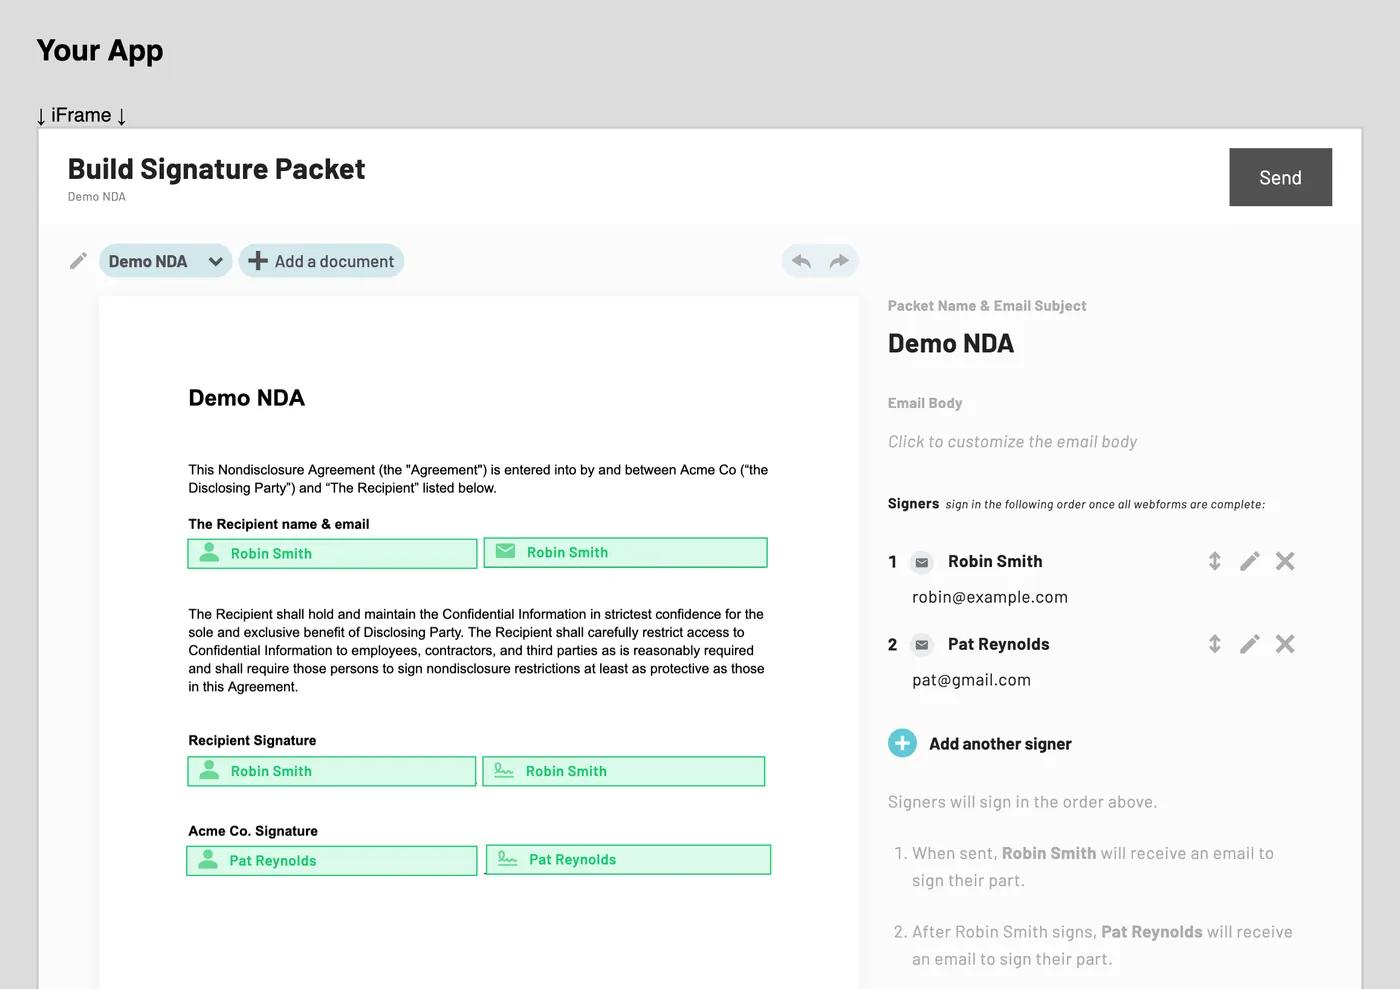 Embedding the Etch e-sign packet builder in a sample app.
The embedded e-sign builder supports the builder's full power. Embedding the e-sign builder is best used for your internal employees, for example, your ops team. With an embedded builder, each person on your team does not need Anvil accounts. You can control access by using your app's own authentication.
Creating a packet
At this time, we allow embedding of an existing draft Etch Packet. We currently do not support embedding the packet creation / upload screen.
Create an e-signature packet via the createEtchPacket mutation. See the guide for documentation on creating e-sign packets.
createEtchPacket({
  // Important than you create a packet in draft mode
  isDraft: true,

  ...otherOptions,
})
Generating an embed link
Once you have the eid of a draft (unsent) EtchPacket, you can generate an embeddable URL with the generateEmbedURL:
const response = await generateEmbedURL({
  variables: {
    eid: 'YOUR_ETCH_PACKET_EID',
    type: 'edit-etch-packet',
    validForSeconds: 10 * 60,
  },
})

// Embed this URL in an iframe!
console.log(response.url)
When the user is finished editing, they will click Send to send the packet to the first signer. On packet send, the parent frame will be notified via postMessage. Etch packet send finish messages will contain action: 'etchPacketSent':
{
  "action": "etchPacketSent",
  "etchPacketEid": "bdwIX5TUiLBzldgdwzL2",
  "organizationSlug": "demo-org"
}
Workflow builder
Embedding the Workflow editor allows your users to build and edit Workflows from your app.
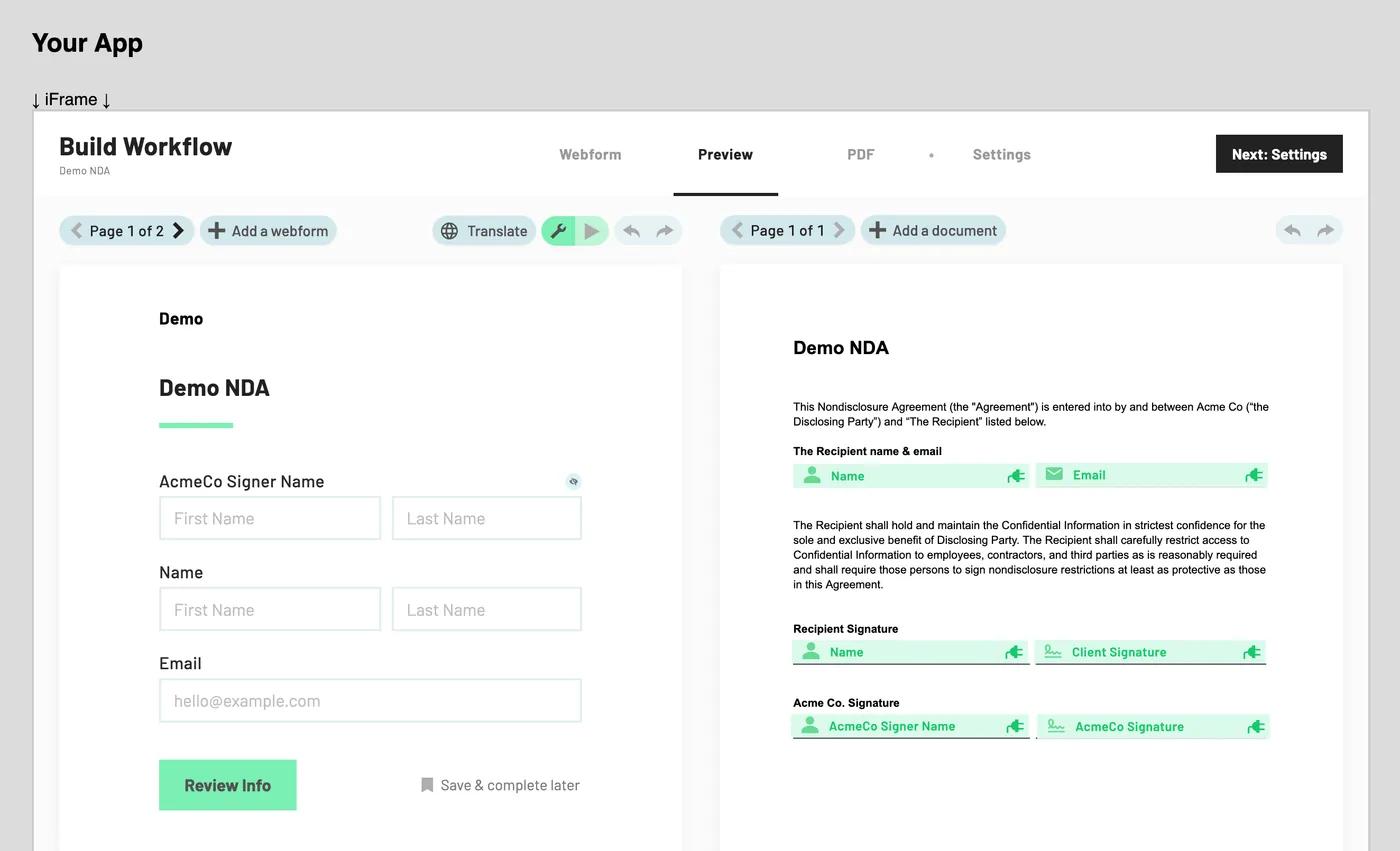 Embedding the Etch Workflow builder in a sample app
The embedded Workflow builder supports the builder's full power. Embedding the Workflow builder is best used for your internal employees, for example, your ops team. With an embedded builder, each person on your team does not need Anvil accounts. You can control access by using your app's own authentication.
Creating a Workflow
At this time, we only allow embedding of an existing Weld (Workflow) object.
If you need to embed a new Weld, you can create one with the createWeld mutation.
mutation createWeld(
  $organizationEid: String!
  $name: String
  $slug: String
  $visibility: String
  $files: [WeldFile]
) {
  createWeld(
    organizationEid: $organizationEid
    name: $name
    slug: $slug
    visibility: $visibility
    files: $files
  ) {
    eid
  }
}
createWeld({
  variables: {
    organizationEid: 'abc123...',
    name: 'My Workflow',
    slug: 'my-workflow',
    visibility: 'draft', // 'draft' will put the editor in Create mode
    files: [
      {
        // Choose existing templates, or upload new files.
        castEid: 'def345...',
      },
    ],
  },
})
Generating an embed link
Once you have a Weld EID, you can generate an embeddable URL with the generateEmbedURL:
const response = await generateEmbedURL({
  variables: {
    validForSeconds: 10 * 60,
    type: 'edit-workflow',
    eid: 'YOUR_WELD_EID',
  },
})
console.log(response.url)
When the user finishes editing the Workflow, the Workflow will be published, and the parent frame will be notified via postMessage. Workflow finish messages will contain action: 'weldCreate' or action: 'weldEdit' depending on whether or not the Workflow has been published before.
// `action` will be 'weldCreate' when the Workflow has not been published yet.
// That is, the Weld object's `visibility` was 'draft' when the embedded URL was
// generated.
{
  "action": "weldCreate",
  "weldEid": "bdwIX5TUiLBzldgdwzL2",
  "organizationSlug": "demo-org"
}

// `action` will be "weldEdit" when the Workflow had already been published.
{
  "action": "weldEdit",
  "weldEid": "bdwIX5TUiLBzldgdwzL2",
  "organizationSlug": "demo-org"
}
Handling errors
If the embedded URL is expired or has been used, the user will be redirected to an error page. Additionally, Anvil will notify the parent frame of the error via postMessage. Your message event handler will receive error messages in the same format as the finish messages:
window.addEventListener('message', ({ origin, data: messagePayload }) => {
  if (origin !== 'https://app.useanvil.com') return
  // messagePayload will be an object in the format:
  //
  // {
  //   "action": "embeddedError",
  //   "errorType": "tokenExpired",
  //   "error": "Token Expired",
  //   "message": "This token has expired",
  //   "requestTokenEid": "YFizcDAV4XH09UCkQ4LI",
  // }
})
AnvilEmbedFrame emits error events via the onEvent handler.
Possible errorType values:
tokenExpired- the token has expired. Recover from this by generating a new embed URL.tokenUsed- the token has been used. Recover from this by generating a new embed URL.tokenInvalid- the token is not valid. Make sure the user attempting to access is correct in your system before attempting to recover from this. This error can happen when a token has been revoked by theexpireSessionTokenmutation.
Revoking a token
You may need to programmatically revoke a token, for example when a user has finished editing. You can use the expireSessionToken mutation with the requestTokenEid from your generateEmbedURL response.
mutation ExpireSessionToken($requestTokenEid: String!) {
  expireSessionToken(requestTokenEid: $requestTokenEid)
}
const didExpire = await expireSessionToken({
  variables: {
    requestTokenEid: 'YFizcDAV4XH09UCkQ4LI',
  },
})
console.log('Was it expired?', didExpire)